Zoom has a function called live transcription that automatically transcribes the audio during the meeting and displays the transcript as subtitles. Using this feature will make it easier for meeting participants to follow the presentation and will make the virtual meeting experience more effective. In this article, we will explain in detail how to automatically transcribe a Zoom meeting and list some other transcription tools that you can use.
Currently, Zoom’s live transcription is only available in English. However, it has been announced that it will support languages other than English in the future, so some people may want to understand how to use it now.
Prerequisites for use
To enable closed captioning during a meeting in Zoom, you need to configure settings for each account, group, and user. However, if the host or admin has disabled manual captions but enabled automatic captions, users with versions older than Version 5.9.0 will not be able to view live transcriptions. In order to use it smoothly, it is better to update the Zoom version to the latest one.
Also, in order to use live transcription without issues, it is necessary to pay attention to the surrounding noise and the speaker’s voice volume and intelligibility. If there is a lot of noise or the speaker’s speech is not clear, the transcription may be less accurate. Furthermore, vocabulary and dialects specific to a country or community may not be reflected correctly. It is a good idea to be aware of the above prerequisites and prepare the usage environment.
Enable subtitles
Once you have confirmed the version and surrounding environment, enable subtitles. There are two main types of subtitles: automatic subtitles and manual subtitles. Automatic subtitles, as the name implies, automatically add subtitles using Zoom’s live transcription function.
Manual Subtitling refers to the ability for meeting attendees to manually provide subtitles, as well as using a third-party transcription service to provide subtitles. In both cases, you need to sign in to the Zoom web portal and enable subtitles, so the procedure is introduced below.
Procedure to enable subtitles (when setting for each account)
- Sign in to the Zoom Web Portal
- Click Account Management > Account Settings
- From the Meeting tab, go to In-Meeting (Advanced) and toggle Manual Subtitles or Automatic Subtitles (Live Transcription) on
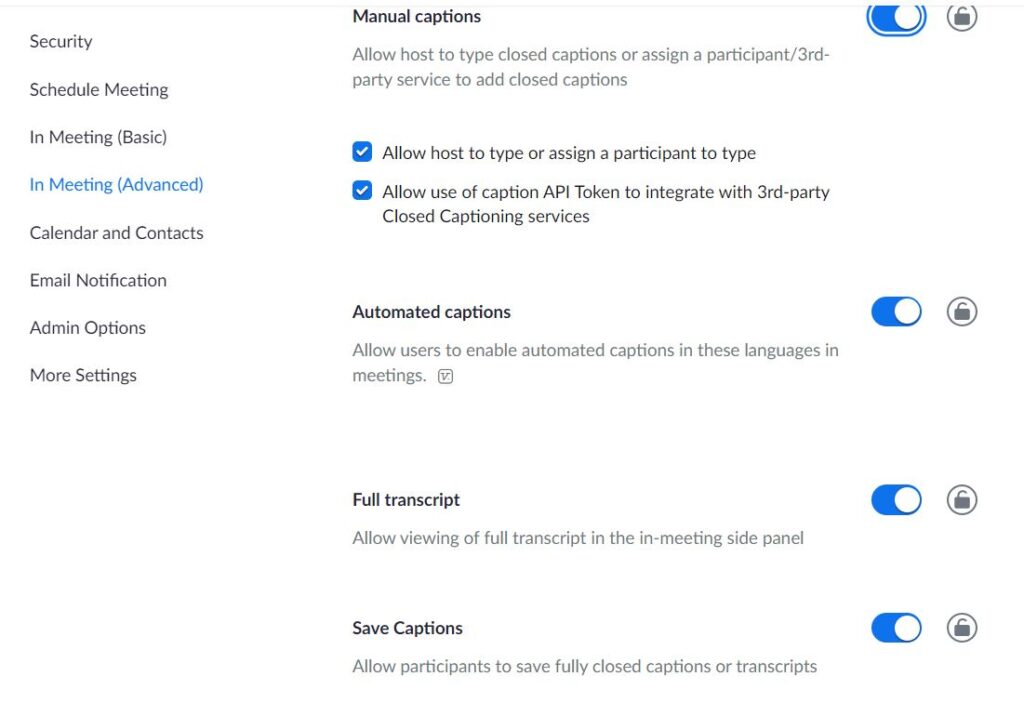
Subtitles can also be activated during the meeting. In that case, you can enable it by clicking [Subtitles] or [Live Transcription] from the call controls → [Enable automatic transcription].
Choosing a transcription tool for Zoom meetings
Zoom’s live transcription function is great, but currently it only supports English. Therefore, if you want to provide subtitles in other languages, you will need to use some additional tools. There are multiple tools for real-time online meeting transcription, but what criteria should you choose?
When choosing a tool, you should at least check whether it supports the languages that you require. Also, if you have many opportunities to hold meetings with overseas branches or overseas clients, choosing a tool that supports multilingual and real-time translation will make the meetings go more smoothly.
Check speech recognition accuracy
Auto-transcription tools are getting better and better, but their accuracy varies greatly.
If you use a tool with low accuracy, you will have more time to rework, and in some cases your work efficiency will be worse. If possible, it is better to use a free trial to check the actual speech recognition accuracy and usability. Also, check the technical capabilities and business content of the company that provides the tool so you can use it with confidence.
Check security measures
One of the concerns about online meetings is whether security is guaranteed. There are many companies that handle confidential information during meetings, so it is important to check the robustness of security in order to prevent information leaks. For example, we recommend that you check the product page for information such as whether or not encryption is used using SSL and how they store backup data.
Check ease of management and sharing
After transcribing an online meeting, many people may want to save the content as minutes or share it internally or externally. Some transcription tools allow you to share a text file with a single click, so it’s a point you want to be aware of if you’re aiming to improve your work efficiency. Also, you should check whether the text data is easy to manage. Especially for companies that have many opportunities for online meetings, tools that are difficult to search for data or complicated to operate may be difficult to use.
Some transcription tools that can be used in Zoom meetings
Here are some transcription tools that can be used in Zoom online meetings.
Notta
Notta is an automatic transcription tool with rich voice input options and processing/editing functions. It supports 104 languages and can be used not only on the web version but also on iOS and Android apps. Since data can be synchronized on multiple devices, it is attractive that it is easy to manage and edit data.
In addition, there is a function called Notta bot that can transcribe the contents of web conferences using Zoom, Google Meet, etc. By using this, you can automatically convert audio such as meetings and interviews into text. You can try it for free and if you like it, there are a number of premium options available.
Speechy
Speechy is a voice input app based on the latest AI and speech recognition engine. It is characterized by being simple and easy to use, and equipped with many functions that are useful when editing, such as a character count function and a function to add vocabulary.
In addition, you can easily translate the text recognized by speech into any language, and it supports more than 88 languages. It can be used not only as a transcription app but also as a translation app, so it will be useful for people who usually hold business negotiations and meetings in multiple languages.
Speechy has a free version and a paid version, but if you want to use it without restrictions, we recommend the paid version. Currently, only an iOS version is available.
Google Docs
Google Docs is a popular free online document editor. I think that many people use it for the purpose of creating documents, but in fact, it can also be used as an automatic transcription tool by using the voice input function.
It’s easy to use, just create a new document, select [Tools] → [Voice Input], and click on the microphone icon to start a conversation or meeting.
The best part about this method is that it is free to use. In addition to being able to use it on PCs such as Mac and Windows, there are also iOS and Android versions of the app, so you can use it regardless of the device.
However, since it is easily affected by the surrounding environment, accuracy may decrease in places with a lot of noise.
Texter
Texter is an application that can transcribe not only audio, but also videos and images. Speech recognition transcription is available for all languages supported by iOS. There are also plenty of functions related to management and sharing after transcription, such as rich list management options and automatic posting settings to Slack.
In addition, real-time translation is also possible through the DeepL MT. The app is also highly rated for its high accuracy in transcription itself, but currently only the iOS version has been released. A wide variety of price plans are available, from a free trial plan to Premium Y for those who want to use it for business.